Ambabee

Amber Brown - Yoga Teacher

  • About
  • Classes
  • Blog
  • Media
    • Photos
    • Video
  • Contact

Introduction to Bandhas

February 26, 2015 by Amber

Have you been to a yoga class and the teacher tells you to “engage your root lock”?

‘What the hell is a root lock?’

You glance around the class hoping to mimic a student who knows what this means, but you see no change in what the other yogis are doing?

If you’re confused by the term “bandha” you’re not alone. Even if you have been practicing yoga for many years you may have never experienced the sensation of engaging the yogic ‘locks’ or Bandhas. Discovering these three zones can unleash new potential in your practice; especially when it comes to your inversion practice (hello handstands!).

20150226_181909

Bandhas
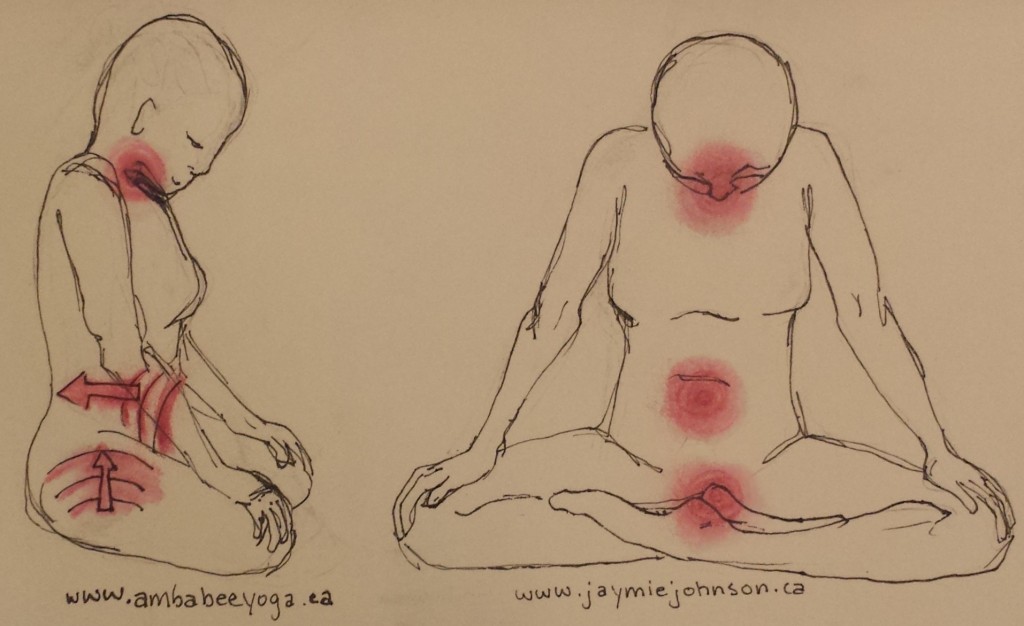
There are three bandhas, or locks, within the body. Bandha means binding or bondage; it is the practice of contracting the muscles and organs of a specific region of your body and thereby controlling the flow of energy within the body.

Read more
  1. Moola/Mula Bandha
    Also known as the root lock, Moola Bandha refers to a lift of your pelvic floor. It involves the controlled contraction of your sex organs, namely the perineal body/cervix. It is believed that by engaging this lock, the downward flow of energy known as apana vayu is forced to rise. It takes practice and awareness to keep your muscle contraction isolated to this area alone.

    • How to: Sit comfortably in sukasana, or simple cross-legged position, with your hands resting on your thighs. Bring your awareness to your breath. Once your breath is steady, shift the awareness to your perineum. For women, practice contracting the cervix and vaginal muscles, much like a kegel. For men, contract the perineum and the area above it. Hold, and then release. Practice a few rounds like this.
  1. Uddiyana Bandha
    Also referred to as the abdominal lock, Uddiyana Bandha involves the lifting of the organs in the abdominal cavity. Uddiyana means to ‘rise up’ and the practice of this bandha is said to raise prana to the higher energy centers, increasing vitality. Uddiyana Bandha should be practiced on an empty stomach and with Jalandhara Bandha engaged as well (described next).

    • How to: You can practice this lock standing or seated, whichever is most comfortable for you.
      • Standing: step your feet hip width apart and bend your knees slightly. Place palms on your thighs just above your knee joints with your fingers facing forward. Keep your spine straight and inhale through your nose. Exhale steadily yet quickly through your nose or slightly pursed lips. After you’ve exhaled completely, suck the abdomen and stomach up and in towards your spine. Hold and when you’re ready, inhale releasing the lock and letting your breath return to normal.
      • Sitting: place a cushion under your sitting bones and sit in sukasana. Place your palms on your knees and sit up with a straight spine. Inhale through your nose, then exhale steady and quickly through your nose or slightly pursed lips. After you’ve exhaled completely suck the abdomen and stomach up and in towards your spine. Hold, and when you’re ready, inhale releasing the lock and allowing your breath to return to normal.

        Practice a few rounds, taking breaks between each round to return to a steady unforced breath.

  1. Jalandhara Bandha
    Throat lock, or Jalandhara Bandha, is the contraction of the throat by releasing your chin down towards the chest. When first learning Jalandhara Bandha, practice it alone. Then, once you get comfortable, practice with other Bandhas or breathing techniques. It is believed that the squeezing of the thyroid gland as a result of this bandha can help moderate the decay of your organs. Traditionally it is said to destroy old age and death.

    • How to: Sit in a comfortable seated position, preferably sukasana, and place your palms on your knees. Take a few slow breaths and allow your entire body to relax, pausing slightly (retaining your breath) on the top of your inhale and bottom of your exhale. Inhale and hold, drawing our chin down towards your collarbone while lifting up through your sternum. Straighten your arms so your shoulders rise up slightly towards your ears. Hold your breath and the lock for as long as feels comfortable. On your exhale, gently raise your head back to center and relax your shoulders down. Return to a natural rhythm of breath for a moment and then repeat.


This is just an introduction to the Bandhas. Each bandha can be elaborated on with great detail, particularly when getting into the energetic influences of these three locks.

Having a basic understanding of where to focus your energy when the teacher mentions any of the three bandhas is a great start. You can practice engaging each of the locks to get familiar with the sensations and control over each area of your body.

Once you become more aware of these three areas, you will begin to notice the effects of engaging them while you are in different asanas. (Downward facing dog is a great pose to practice engaging all three bandhas). When you bring the concept of the Bandhas to your inversion practice you will notice how the drawing up of energy will help with your alignment and steadiness.

Reference:
Swami Muktibodhananda, 2013. Hatha Yoga Pradipika

Artwork:
Jaymie Johnson

Filed Under: Bandhas, Mini Flows, Misc Blog, Uncategorized Tagged With: Bandha, Bandhas, Jalandhara, Locks, Mula, Uddiyana, Yoga

Stretch out those ski legs! *Yoga for Skiers*

November 24, 2014 by Amber

IMG_20141124_203529This year I converted.

I made the switch from snowboarding to skiing.

I was motivated to convert after a trip to Elfin Lake hut last winter. I watched as the skiers quickly climbed hills with their skins, while I slowly trudged up the mountain on snowshoes with my snowboard strapped to my back.

10423878_10154844867955055_1255976639566809084_nTwo weekends ago was my first time ever on skis. We hiked to Keith’s hut and skied Anniversary glacier. The next day my legs ached. Apart from being covered in bruises from all of the falls I took, my muscles were really sore-skiing gave my legs a serious work out!

So, with the start of the ski season, I’ve designed this little flow to help all the skiers stretch-it-out after enjoying some (hopefully) powder filled days!

Click for Skiers Yoga Flow
  1. Butterfly/Bound Angle Pose {Baddhakonasana}
    IMG_20141123_155013 IMG_20141123_153402
    Baddhakonasana stretches out the groin and inner thighs, making it a wonderful pose for after skinning up a mountain or snowshoeing.IMG_20141123_155422• Sit with your legs extended straight out in front of you, if you have tight hips sit on a folded blanket
    • Exhale and bend your knees, bringing your heels in close to your pelvis, feet flat on the floor
    • If you are tight in the hips or groin move your heels further from your pelvis
    • Relax your knees out to the sides (like an open book), bring the soles of your feet together and grasp your feet your hands
    • For a deeper stretch, guide your feet in closer to your pelvis
    • Press the outer edges of each foot into the floor
    • Stay here and breathe
    • To try a more advanced version, extend your torso forward over your feet as far as you can while maintaining a straight spine. Once you’ve reach your maximum extension with a straight spine, begin to round the spine, relaxing the head towards the floor. Elbows should be on the outside of your shins
    • To come out: Inhale, lift your knees away from the floor (like closing a book), feet flat on the floor. Next extend your legs straight out in front of you
  2. Wide Legged Forward Bend {Prasarita Padottanasana}
    IMG_20141123_171742
    This pose helps to decompress the spine after skiing all day and stretches the back of the legs as well as the inner thighs
    • Stand so you are facing the wide side of your yoga mat and step your feet wider than hip-width distance apart
    • The taller you are the wider the distance between your feet should be; Or you can increase the distance if you want a deeper stretch
    • Feet should be parallel to each other
    • Press firmly into the mat with your big toe and outer edges of your feet
    • Inhale, place your hands on your hips, lift up through the sternum and straighten your spine
    • As you exhale, hinge your torso forward moving from the hips and maintaining a straight spine
    • When your torso is parallel to the floor, release your hands to the mat (you may need to shorten the distance between your feet if you struggle here)
    • Open the pelvis by rotating the inner groins away from each other
    • Pressing the floor away from you, inhale and lift your chest up away from the floor
    • As you exhale walk your hands between your feet, relax your head down while maintaining length in the back of your neck
    • Bend at the elbows, upper arms perpendicular to your legs, fingertips pointing forward
    • Keep the arms parallel to each other
    • Maintain the length in the front of your torso while bending forward
    • Spread and widen through the shoulder blades, lift the shoulders away from your ears
    • To come out: walk your hands along the floor so that they are under your shoulders, lift your torso so that it is parallel with the floor. Place your hands on your hips and as you inhale root down through your tailbone and guide your torso to an upright position stacked ontop of your pelvis. Step the feet back hip width distance apart.
  3. Downward Facing Dog Variations {Adhomukha Svanasana}
    In one pose, downward facing dog targets many of the areas of the body that can tense up after a day of skiing. It stretches out the shoulders, hamstrings and calves. These two variations are also great ways to get the most out of this posture! 
    IMG_20141123_171141
    • Come to all fours on your mat; knees directly under your hips, palms slightly ahead of your shoulders (shoulder width apart), press your palms and the pads of each finger into the mat firmly
    • Tuck your toes under and as you exhale lift you knees up off the mat, straightening your legs
    • Lift your sit bones high towards the sky, coming up onto your tippy-toes
    • Lengthen from your tailbone
    • As you exhale release your heels to the mat (or as close as possible), firm your outer thighs
    • Firm your outer arms and lift from your wrists up your inner arms to your shoulders
    • Firm your shoulder blades on your back and draw them toward your pelvis slightly
    • Do not let the head hang, maintain length in your neck but suspending the head in line with your straightened armsVariation I – Walk the

    Dog
    IMG_20141123_170654 IMG_20141123_170738

    • From downward facing dog; as you exhale, bend your knee (alternatively/one at a time) towards your torso, lifting the heel off the ground
    • Keep one leg straight and strong with the heel rooted down while you bend the opposite leg at the knee
    • Keep the hands pressed firmly into your mat, pressing equaling through both hands
    • Continue alternatively bending each knee until you feel you’ve warmed up the hamstrings sufficiently, then return to downdogVariation II – Knees to chest
    IMG_20141123_170830
    • After walking the dog; Come to downward facing dog
    • Inhale and lift your heels up off the mat, sit bones high to the sky, legs straight
    • Press your hands firmly into your mat, and as you exhale bend both knees at the same time, releasing your thighs as close to your torso as possible while maintaining a straight spine
    • Hold and breathe
    • When you’re ready, inhale and straighten the legs
    • As you exhale slowly release your heels to the mat, coming back into downward facing dog

  4. Pigeon Pose {Eka Pada Rajakapotasana}
    Pigeon is an excellent hip opening posture. It targets the hip flexors (the psoas and iliacus muscles), lengthening them and increasing mobility in the hips-making it the perfect pose for skiers! If you are tight in the hips have a prop on hand, a yoga block, folded blanket or pillow will work well.
    IMG_20141122_194029 IMG_20141122_194425
    • From Downward facing dog; Inhale and shift your weight forward, brining your right knee on the mat between your palms
    • Your right ankle should be behind your left wrist, flex your right foot
    • Using your palms for support, gently lower your pelvis towards the mat while sliding your left leg back straight; the left leg should be in line with your left hip, relax the top of your foot on the floor
    • Centre your weight evenly in your pelvis and square your hips to the front of your mat; this is when your prop might come in handy, place a yoga block, pillow or folded blanket under your left hip to level out your pelvis. If your right hip doesn’t come close to the floor you can place support under both hips, ensure your pelvis is level
    • If you want a deeper stretch, slide your right foot further from your pelvis
    • Tuck your chin in slightly to elongate your spine and on your next exhale gently release your torso over your thigh; you can stack your palms and rest your cheek on your hands; or extend your arms forward, palms facing down and relax your forehead on the ground
    • To come out: Inhale, pressing your palms into the mat for support, gently peel your torso up off your right thigh. Tuck the toes on your left foot under, inhale and slowly send your right leg back into downdog
  5. Low Lunge {Anjanevasana}
    This pose feels great after skiing! It stretches out the thighs and groin and offers variations depending how deep you want to get into the hip rotators.
    IMG_20141123_171621
    • From Downdog; bring your gaze in between your palms at the front of your mat
    • As you exhale step your right foot to the front of your mat between your palms
    • Your right knee should be at a 90º angle, knee directly above your right ankle
    • Keep the right knee fixed in this position and slide the left foot away from you while lowering the left knee to the floor, you should feel a nice stretch in the thigh and groin (if there is any pain, shorten the distance between your left knee and right foot)
    • Flatten the left foot so that the top of the foot is on the floor
    • Press the big toe and heel of your right foot firmly into the ground
    • Lift your chest and firm your shoulders blades, as if you are squeezing a pencil between them
    IMG_20141123_155539
    • **advanced** From here you can roll onto the outer edge of each foot, rotating your hips towards the right. Left palm on the mat stacked under your left shoulder, place your right palm on the inside of your right knee and gently press the knee away from you, sinking the left hip deeper towards the mat
    IMG_20141123_160721 IMG_20141123_160614

IMG_20141110_093431

Filed Under: Hamstring Flexibility, Mini Flows, Misc Blog, Uncategorized, Yoga Poses

Four poses to increase hamstring flexibility

September 1, 2014 by Amber

A common struggle for many yoga students is hamstring flexibility. Active people often have tight hamstrings, which can limit your yoga practice and cause you to compromise your lower back in many poses. The key to improving your practice and hamstring flexibility is patience and practice, however there are some poses which are especially effective in getting you there a little faster.

PicsArt_1408219506613

Click for Hamstring Flow
The mini flow outlined below takes you through 4 poses that, if practiced frequently, will give you noticeable results. Start on the Right side, then do the entire flow again on the Left side. Hold each pose for as long as desired, the longer you hold, the deeper into the stretch you will get.

1) Extended Triangle Pose {Utthita Trikonasana}

This pose targets the thighs and helps to increase flexibility in the hamstrings, groin and shoulders. The slight twist stimulates the organs in your abdomen, which can improve digestion.

How to get into Utthita Trikonasana:

Triangle pose

  • Start in Mountain pose/Tadasana (simply standing, feet hip width apart, at the front of your mat)
  • On exhalation, step your left foot back at a 45º angle, coming into Warrior 2 pose with your arms extended in line with your shoulders and parallel to the floor, palms down
  •  Right foot is in front, knee bent at 90º (careful not to bring the knee forward over your right foot)
  • Transition to triangle pose by straightening your right leg, keeping the right knee in line with your right ankle
  • On your next exhalation reach toward the front of your mat, moving your torso forward while keeping in line with your right leg, you should be moving from your hips (not waist)
  • Root down through your left foot, keeping the left leg straight and strong while pressing the heel of your foot down
  • Rotate your torso to the left, leading this movement with your left shoulder, keep both sides of your torso long
  • Bring your right hand down on your shin, ankle, foot or floor (maintaining length in both sides of your torso)
  • Extend the left arm towards the sky, fingers together pointing upwards and shoulders in one line


2) Intense Side Stretch {Parsvottanasana}

This pose targets your outer hamstrings and can also help stretch out your IT band (aka iliotibial).

How to get into Parsvottanasana:

Intense Side Stretch

  • From Extended triangle pose; exhale (gazing at the right foot) and slowly lower your fingertips on your left hand to the floor on the inside of your right foot while rotating your torso to the right, right fingertips on the outside of your right foot (if you cannot reach the floor place two blocks on either side of your right foot)
  • Square your hips by turning the heel of your left foot (your back leg) so that it is in line with the toes and pointing towards the front of your mat (the same direction as your right foot)
  • Adjust the distance between both feet so that you can comfortably straighten both legs, keep feet hip width apart and press down through the big toes and heel
  • Firm your thighs, slightly squeezing them inward as if you are holding a block between them
  • Ensure both knee caps are in line with the ankle of the corresponding leg
  •  Check your hips, they should be in line parallel to the front of your mat, make sure you’re not rotating the pelvis reaching one hip toward the front more than another
  • Keep your torso parallel to the floor over the right extended leg, reaching forward from the grion/hips
  • Inhale and on your next exhale slowly lower your torso as close as is comfortable towards the right thigh

3) Low Lunge {Anjaneyasna}

This pose targets your groin and thighs, the deeper you sink into your hips the deeper stretch.

How to get into Anjanevasana:

Low Lunge

  • From Intense Side Stretch; bring your gaze to the floor just past the toes on your right foot
  • Press the big toe and heel of your right foot firmly into the ground, exhale and slowly shift your weight forward, bending the right knee and moving your torso over the right thigh
  • Stop when your right knee is at a 90º angle, knee directly above your right ankle
  • Keep the right knee fixed in this position and slide the left foot away from you while lowering the left knee to the floor, you should feel a nice stretch in the thigh and groin (if there is any pain, shorten the distance between your left knee and right foot)
  • Flatten the left foot so that the top of the foot is on the floor
  • From here you can place both hands on the inside of your right foot, for a deeper stretch lower your forearms to the floor (watch that the right knee does not extend over the right ankle towards the front of your mat)
  • Lift your chest and firm your shoulders blades, as if you are squeezing a pencil between them


4) Half Front Splits {Ardha Hanumanasana}

This Pose  strengthens your hamstrings and focuses on your hips, hamstrings and calves.

How to get into Ardha Hanumanasana:

Half Splits

  • From Low Lunge; place your right hand on the outside of the right foot, left hand on the inside
  • Inhale and lift your torso up at the same time lifting your right toes off the mat and shifting the weight to your right heel, flex your foot
  • Slide your left knee forward on the mat so that it is directly under your hips
  • Bring your torso stacked on top of your pelvis, hands on your hips and spine in a straight line
  • Square your hips with the front of your mat
  • Engage the muscles of your thigh and core
  • Moving from the pelvis, exhale and slowly fold over your right thigh, placing your hands on the floor (or on blocks) on either side of your extended leg
  • Check in with your hips, make sure they are even by pressing the right hip back and drawing the left hip slightly forward
  • Breathe deeply, and when you’re ready, inhale bring the right knee forward to a 90º angle
  • Tuck the toes on the left foot under, and lift the left knee of the mat transitioning into lunge
  • Step the right foot back, transitioning into downdog

Filed Under: Hamstring Flexibility, Mini Flows, Misc Blog

  • About
  • Classes
  • Blog
  • Media
  • Contact

Copyright © 2023 · Parallax Pro Theme on Genesis Framework · WordPress · Log in